Note: this guide focus on App Service Windows hosting platform, not for Linux.
In this guide, we will deploy a simple Remix app on Azure App Service. I had a hard time to get it working, so I hope this guide will help you. Below are an overview of the stack:
- Remix v1.18.1 with Express server
- GitHub Actions for CI/CD
- Azure App Service
- Hosting platform: Windows
- Node.js 18 LTS
Create a new Remix app
First, we need to create a new Remix app. We will use the create-remix command to create a new app.
npx create-remix@latest
The CLI will prompt us a few questions, here are my choices:
- ? Where would you like to create your app?
my-remix-app - ? What type of app do you want to create?
Just the basics - ? Where do you want to deploy? Choose Remix App Server if you’re unsure; it’s easy to change deployment targets.
Express Server - ? TypeScript or JavaScript?
TypeScript - ? Do you want me to run
npm install? (Y/n)Y
Once the CLI prompts are done, we can test the app locally with npm run dev. And we should see the app live at
http://localhost:3000.
Next, create a new GitHub repository and push our code to it. We won’t cover this step in this guide.
Create App Service
We will create a new App Service on Azure, either via the portal or CLI. I will use the Azure Portal:
- Go to the Azure Portal and click on the
Create a resourcebutton. - Search for
Web Appand click on theCreatebutton. - Fill in the form with the following information:
Subscription: choose your subscriptionResource group: create a new resource groupName: choose a name for your appPublish: CodeRuntime stack: Node 18 LTSOperating System: WindowsRegion: choose a regionPricing plan: choose one
- Click on the
Review + createbutton. - Click on the
Createbutton. - Wait for the deployment to complete.
Setup GitHub Actions
Once the App Service deployment is done, click on the Deployment Center button on the left menu. We will use GitHub
Actions to deploy our app to Azure. Click on the GitHub in the Source dropdown and follow the instructions to connect
your GitHub account.
At the bottom of the setup, it offers a “Workflow Configuration” option to help us configure the GitHub Actions workflow. We can accept the default configuration, but we will need to make some changes to suit our needs.
Check the source code on GitHub, and update the added workflow file with the following content:
name: Build and deploy Node.js app to Azure Web App
on:
  push:
    branches:
      - main
  workflow_dispatch:

jobs:
  build:
    runs-on: ubuntu-latest
    steps:
      - uses: actions/checkout@v3
      - name: Set up Node.js version
        uses: actions/setup-node@v3
        with:
          node-version: "18.x"
      - name: npm install, build, and test
        run: |
          npm install
          npm run build --if-present
          npm run test --if-present
      - name: Zip artifact for deployment
        run: zip release.zip ./* -r
      - name: Upload artifact for deployment job
        uses: actions/upload-artifact@v3
        with:
          name: node-app
          path: release.zip

  deploy:
    runs-on: ubuntu-latest
    needs: build
    environment:
      name: Production
      url: ${{ steps.deploy-to-webapp.outputs.webapp-url }}
    steps:
      - name: Download artifact from build job
        uses: actions/download-artifact@v3
        with:
          name: node-app
      - name: "Deploy to Azure Web App"
        uses: azure/webapps-deploy@v2
        id: deploy-to-webapp
        with:
          app-name: "<YOUR_APP_NAME>"
          slot-name: "Production"
          publish-profile: ${{ secrets.<YOUR_AZUREAPPSERVICE_PUBLISHPROFILE> }}
          package: "release.zip"
The main difference we made are upgrading the actions to the latest versions, zipping the files before deploying to
Azure (this significantly speeds up the deployment process), and set the azure deploy package name to be our zipped file
release.zip.
You should also check out the Action secrets tab and notice that Azure added a new secret called
AZURE_WEBAPP_PUBLISH_PROFILE. This secret contains the publish profile for our App Service.
Getting Azure ready
We need to configure few more files to make our code to work on Azure.
web.config
App Service, the Windows-based server requires a web.config file to manage the IIS server [1]. We can create a new
file at the root of the project with the following content:
<?xml version="1.0" encoding="utf-8"?>
<configuration>
  <system.webServer>
    <webSocket enabled="false" />
    <handlers>
      <add name="iisnode" path="run.cjs" verb="*" modules="iisnode"/>
    </handlers>
    <rewrite>
      <rules>
        <rule name="NodeInspector" patternSyntax="ECMAScript" stopProcessing="true">
          <match url="^run.cjs\/debug[\/]?" />
        </rule>
        <rule name="StaticContent">
          <action type="Rewrite" url="public{PATH_INFO}"/>
        </rule>
        <rule name="DynamicContent">
          <conditions>
            <add input="{REQUEST_FILENAME}" matchType="IsFile" negate="True"/>
          </conditions>
          <action type="Rewrite" url="run.cjs"/>
        </rule>
      </rules>
    </rewrite>
    <security>
      <requestFiltering>
        <hiddenSegments>
          <remove segment="bin"/>
        </hiddenSegments>
      </requestFiltering>
    </security>
    <httpErrors existingResponse="PassThrough" />
  </system.webServer>
</configuration>
You may notice we defined a file called run.cjs in the web.config file. Where is it?
If we inspect the package.json file, we will see the type: module field, and the root server.js includes several
import statements. This is because Remix are using ESM instead of CommonJS. Whereas in Azure App Service, the
interceptor.js from iisnode expects a Common JS file as entrypoint [2]. Therefore, we need to create a run.cjs
file as a wrapper for the ESM server.js.
run.cjs
import("./server.js");
Summary
Now, we have everything ready to deploy our app to Azure. Commit and push the changes to GitHub, and the GitHub Actions
workflow will be triggered to deploy the app to Azure. If everything goes well, we will see the app running on Azure in
the following URL: https://<APP_NAME>.azurewebsites.net
Here’s a list of checklist to make sure everything is working:
- create Remix app with Express server
- create GitHub repo and push the code
- create Azure App Service
- setup GitHub Actions workflow
- create
web.configfile - create
run.cjsfile - commit and push the changes to GitHub
Troubleshooting
How to enable logging?
For Windows apps, we can enable logging by enabling the setting in the “App Service logs” tab on Azure portal.
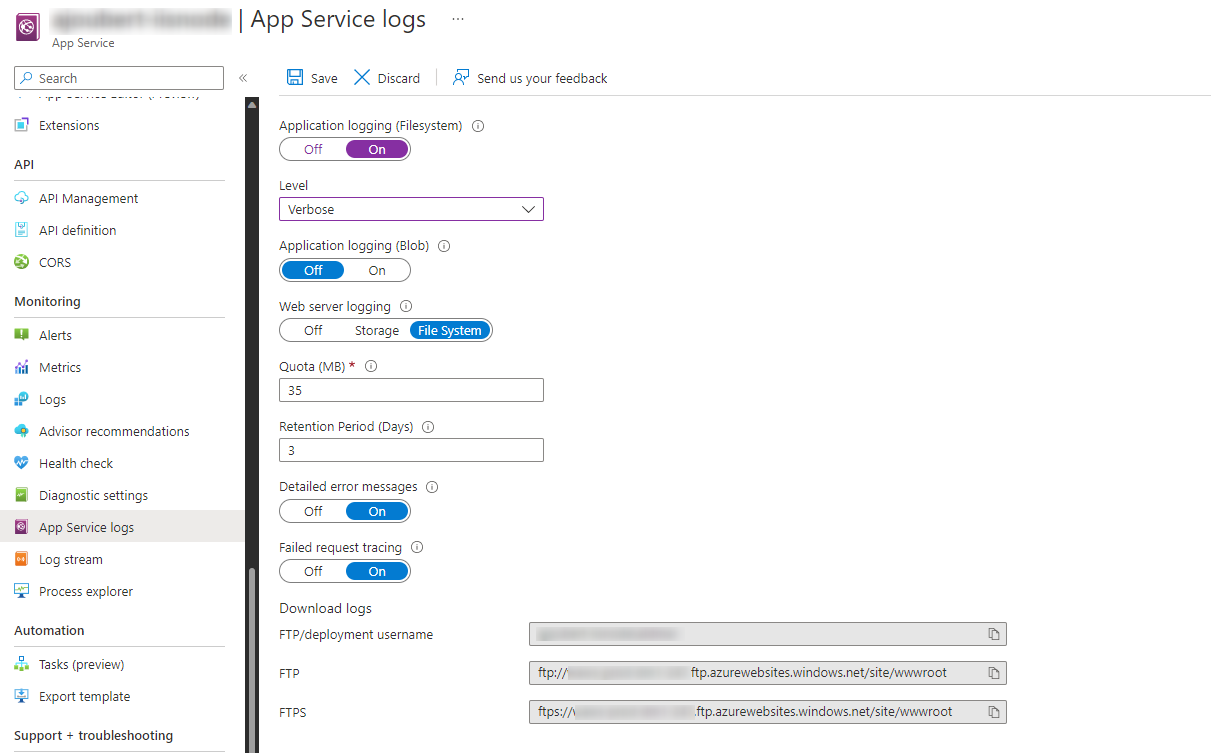
Next, view the logs at the “Log stream” tab, when we access the website url.
Alternatively, create a new file at root directory called issnode.yml with the following content [3]:
loggingEnabled: true
logDirectory: /home/logfiles/iisnode
devErrorsEnabled: true
Then, we will see the logs at D:\home\site\LogFiles\Application\logging-errors.txt.
Error: Failed to deploy web package to App Service. Conflict (CODE 409)
On Azure portal, go to App Service > Deployment Center > click on “Disconnect” button. Then, try to deploy again.
Error: You do not have permission to view this directory or page
This is most likely because you don’t have a web.config file in your root directory or it is not configured correctly. See more info here: https://learn.microsoft.com/en-us/azure/app-service/configure-language-nodejs?pivots=platform-windows#you-do-not-have-permission-to-view-this-directory-or-page
References
[3] https://azureossd.github.io/2022/10/17/troubleshooting-common-iisnode-issues/